Why You Should Use Visual Voicemail on iPhone

It’s easy to get all of the functionality of visual voicemail for iPhone and have all of your messages automatically sent to your phone in a few minutes. All you need is a little bit of information and you can have your messages appear while you are away from your computer. All you need is a few minutes to set up your account. If you don’t want to go through the process of setting up the account, you can use the link here to set up visual voicemail on your iPhone. You will also find all of the information you will need to know in the article.

visual voicemail on iphone

How to set up visual voicemail on your iPhone

What is visual voicemail on iPhone? Visual voicemail is a newer technology that provides a similar service as a conventional email but allows you to access your voicemails through your iPhone instead. You will need a computer with internet access, an iPhone, and the newest version of the iMessage software (varying between v4 and v5). Once you have these items, your computer should already be on. Once you have the latest version of the iMessage software installed, you are ready to set up your account and get yourself connected.

How to get your voice messages appearing on your iPhone

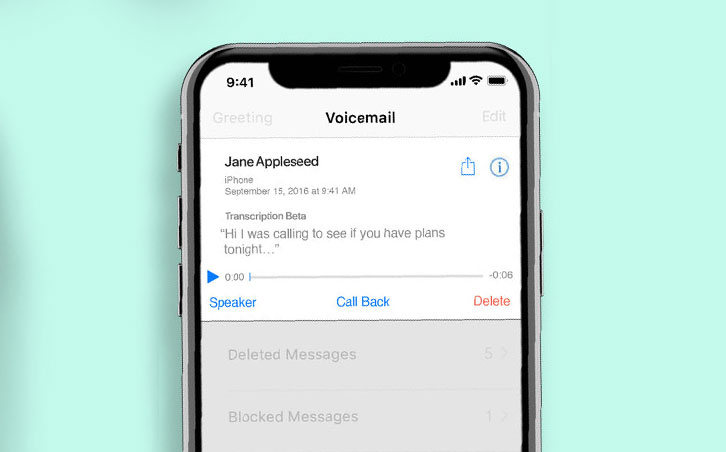
Visual voicemail on iPhone works the same way as traditional email where you select the messages you want to save and then save them to your computer. When you receive a message, all you have to do is take out your phone, touch the send button, and instantly you can see your recent voicemail messages on your phone’s screen. This is a great feature because not only does it save you time but also keeps you from missing an important message you may have missed due to being out of the office or out of the house. You can even preview each message to make sure you want to listen to it before actually listening to it.

open visual voicemail on iphone

I’ve found this is a great way to preview voicemail messages when you have an unexpected call and you don’t want to miss it. If you’ve ever received a voicemail message from an unknown number, then you know how frustrating it can be to preview and then delete. This will save you time and avoid situations like that. Also if you’ve never received a voicemail message from a cell phone number before, then you’ll probably want to go into your contacts and check it out. It’s worth it to take a few minutes to preview a few messages and make sure they’re something you want to save.

The reason why you should use Visual Voicemail

Another reason for which you should use visual voicemail on iPhone is that it supports your home network and most cellular network carriers support it. This means you can go to your cellular network provider’s website and look for instructions on enabling visual voicemail on your iPhone. Most providers will also tell you how to test your home network to see if you can receive voicemails on it.

The last thing you need to know about visual voicemail on iPhone is that you change voicemail passwords regularly. You should change your voicemail password at least once a week or as recommended by your cellular provider. When you change your voicemail password, you should also change your confirmation message. The message you’ve just received could have information like your new password and confirmation so you don’t want to accidentally remove it. For this reason, I recommend that you check your voicemail settings app every week and set your password and confirmation message.

iPhone 13 Guide for Seniors and Beginners to Upgrade the Sophisticated Technology

What do you know about the iPhone 13 guide for the senior? It is one of the ways for you to keep up to date though you never change your phone. You might not include the people who like to change something in a fast time. You are the loyal people or think that the character is like childhood.

Moreover, there are many features helping your necessary. Nonetheless, you may not be left behind toward the development of technology. Besides that, the presence of the tips keeps eases you to get something. By the way, there are iPhone 13 user guide for seniors and beginners.

iphone 13 guide

Tips to operate your iPhone 13 ike new

Enjoy your old phone such as you are operating the new one. Get the easiness through these 7 tips:

  1. Magnifying glass

Get features Use a magnifying glass on your iPhone to read the sides of the bottle or small print. You can use an inbuilt camera to make a magnifying glass.

  1. Scan documents with the camera

You can take photos of documents for PDF versions with iOS 11. The benefit of this feature is to send a signed document, form or scanned document back.

  1. Add Emergency Contact

Get emergency contacts from the Health app with SOS Emergency on iOS 11. This feature accelerates you when asking for help in an emergency.

  1. Reader for Safari Browser

Safari Reader makes it easy for you to read long articles on websites without ads, links, and other information.

  1. Increase font size

You can adjust the text for the Mail, Message, Notes, and Contact applications. The right text size will make it easier to read.

  1. Screenshot and Tag

How to take screenshots is enough to quickly press and release the side buttons along with the volume up button. How to tag, share or save screenshots by tapping thumbnail images?

  1. Buy applications, music, or books without a credit card

Use credit from your Apple ID to buy these applications in one of the stores. This store can be an iTunes or App store and you can get credit from buying it.

How to Add the Emergency Contact in Detail

As one of the examples, you can add the emergency contact with 5 steps below:

  1. Open the Health application and the Medical ID tab.
  2. Tap Edit then goes to Emergency Contact.
  3. Add emergency contacts by tapping the green plus icon.
  4. Tap the contact and add their relationship.
  5. Tap “done” and you have automatically saved your changes.

Always be up-to-date with people everywhere and every time. Certainly, it is not difficult to always add your insight. Moreover, there is an internet which is ready to help everyone. Thanks for reading the iPhone 13 guide for the senior!

The Secure Methods on How to Backup iPhone on Mac

At this time, perhaps you are still browsing the internet to find the easy and secure way to copy and move your iPhone data to your Mac. You are landing on the right place. Today, we are going to show you the 2 methods on how to backup iPhone to your Mac, including backing up videos, music, photos, ebooks, apps, contacts, messages, and many more.

backup iphone on mac

2 Methods How to Backup iPhone on Mac

Method 1 – Using Syncios iPhone Manager

A free app can transfer even more than 12 types of data between iDevice and Mac. All the backup data has its lossless quality at anytime with the transfer data between several devices. It supports you to extract data from iTunes backup. However, this app has some issues like no online source downloading feature, cannot support you to search music, and it has les feature than Windows version.

Follow the steps below to start using this app.

  1. Download and install this tool for Mac. You should also have iTunes on your Mac. You do not have to run iTunes when you use this tool.
  2. Connect your iPhone to Mac. Use a USB cable and plug your iPhone. Launch the tool to Mac backup software. It starts displaying all data on your iPhone, such as videos, music, photos, messages, messages, contacts, apps, bookmarks, notes, and call logs.
  3. Backup Music from iPhone to Mac. To do so, click Media on the left panel and select Music from right. Choose the songs you want to backup in your iPhone to Mac. Hold down Command key to choose multiple songs. Alternatively, press Command+A to choose all songs. Then, click the Export button. You also need to browse the output location and then expert the music from iPhone to Mac.

Method 2 – Using iTunes

It supports online music and apps downloading, backing up settings, camera roll, messages, documents, saved games, and more. It is compatible to iPod, iPad, and iPhone models. However, it can clear thing that you need while restoring, frozen interface, and unable to view the backup files on Mac.

Follow the steps below to start using this method.

  1. Close iCloud before backup

Make sure that the iCloud is off on your device. It is impossible to backup via iTunes if the iCloud is on. To start, go to Settings, select iCloud, go to Storage & Backup to turn off the switch of the iCloud backup

  1. Connect iPhone or iPad to Mac and open iTunes
  2. Start Backup

Your device is in the left panel, choose and click Back Up Now on the right. Those are all guide on how to Backup iPhone on Mac.

Two Significant Matters in iPhone XR User Manual You Should Know

iPhone XR user guide is very essential for you who have just bought an iPhone XR. Why can it be like that? Yea, the reason is that the iPhone XR user manual PDF will help you to know everything about it. It can be the ways to set up this iPhone XR and also the additional user manual of the iPhone XR. Completely, you will find both matters in this following review.

iphone xr user manual

How to Set Up iPhone XR According to User Manual for iPhone XR

When do you want to find the ways of using the iPhone XR, don’t worry! It will be available for you. So, just follow these ways well!

  • Insert the SIM card

The first step that you have to do in using your iPhone XR is inserting your SIM card. It must be done because this step is very important in order to be able to start using your iPhone XR. In relation to the SIM card, you are suggested to buy a nano SIM. It is because this iPhone XR uses the nano-SIM.

  • Complete the set up of iPhone XR

After inserting the SIM card is done, don’t forget to complete the set up of your iPhone XR. It can be recognized by turning on your iPhone. When you turn on the iPhone, you will find the icon of Setup Wizard. What does it mean, guys? Yea, it means that it is necessary for you to set up your iPhone. The first thing that you can do is swipe across the screen. Also, please select the language that you want to use and the region where you live.

  • Set up the Touch ID

In order to be able to set up the Touch ID on your iPhone XR, you are suggested to scan your own print. After that, just click continue. In addition, when you want to protect the data, you can set the password.

Additional Iphone XR User Manual

Actually, there are three additional matters of the user manual in the iPhone XR. Do you want to know them? Let’s check them out!

  • Navigating around

In fact, there are many buttons that can be used and of course, it has a different function. Thus, you are very suggested to memorize all of them well.

  • Connect to the internet

If you want to connect your iPhone XR to the internet, what can you do? It is very easy to do. Just turn on the Wi-Fi network that is available. However, if you want to use your data, just turn on your cellular data.

  • Set up the email

In relation to that, you can set up the email by going to the setting, tap the email, and select your account. After that, you can sign in to your account by entering your password.

Well, both are the important matters that you can know from iPhone XR user manual. It will be beneficial for you if you understand it well.

The Simple iPhone XS User Guide for Beginners and Seniors

Do you look for a review about iPhone XS user guide for beginners? If it is so, it will be suitable as your need. Talking about the iPhone XS, actually, it is included to the iPhone user guide for iOS 11.

o, don’t be confused! Well, if you are the iPhone XS user and you don’t recognize the way to set up your phone, what will you do? Surely, you need the iPhone XS user guide in order to be able to access all of the applications on your phone. Do you agree? It should be like that.

iphone xs user guide

Three Important Matters in the iPhone XS User Guide for Beginners

Related to the user guide of iPhone XS for beginners, what do you know about it? In fact, there are three essential matters that you should do in the iPhone user guide for beginners. Have you known them, guys? Just follow these ways well!

  1. Insert the SIM card

The first thing that you have to do is inserting a SIM card to your iPhone. You must do it because it is very important in order to be able to start your iPhone. In this case, because you are the users of iPhone XS, we suggest you insert a nano SIM. Why can it be like that? Yea, the reason is that the iPhone XS uses a kind of SIM card which is nano.

  1. Complete the Setup of iPhone XS

Then, completing the Setup of iPhone XS is the second thing that you should do. After inserting the SIM card, you can turn on your iPhone. When the process of turning on the iPhone is running, you will find the icon of Setup Wizard. Essentially, that icon is used to set up your iPhone. In order to be able to start it, it is suggested for you to swipe across the screen of your iPhone.

In this case, you will set the language which you will use and click your country. Besides, you can click the network of Wi-Fi or you can also use the mobile connection to connect.

  1. Set up the Touch ID

The last important thing in the iPhone user guide is set up the touch ID. When you will do this process, you should follow the steps that are available. It is done in order to scan your own print. If it has finished, you can click continue.

Okay, guys, those are the important things in the iPhone XS user guide for beginners that you can learn. So, have a nice learning!

How to Use iPhone As an IP Camera to Monitoring Your Assets

Due to the popularity and portability. iPhone becomes one of the most ideal choice to monitor the camera surveillance video among the various mobile devices. With your iPhone, you can build a perfect security system for surveillance. You will first need to ensure a computer and network are both accessible to transfer the video feed to the browser. An APP is also needed to connect your iPhone and the camera feed to get the sync video. Alternatively, Safari can be chosen on your iPhone to use as the web browser instead of the APP. Keep in mind.

use iphone as an ip camera

Step by Step Use iPhone As an IP Camera

Step 1:

Install the IP camera viewer app. The proper is needed to view on your iPhone. The APP can be searched in store and updating constantly. Take a while to make the good comparison with them and purchase one. I will recommend the iCam app by SKJM and the IP Cam app by Senstic. Both of the two APP work well either receive camera feeds to transfer to a smooth video or applied as a motion detection sensor. The email alerts for detected movement perform as well as on the computer. Usually, hundreds can be available, but unluckily, the majority of them are no longer free.

Step 2:

iPhone prepare. Before turning your iPhone, you need to make sure your iPhone would not ring or beep on its own to avoid unnecessary alert that effects the monitoring. Turning down the sound of the certain app is quite necessary. Such as the daily alarm clock. You can also convert to No Disturb mode to prevent any rings, alerts, and noise which will occur. There is another option to turn your phone into flying mode. Remember to access the wifi network again for the Wifi turns off automatically in flying mode.

Step 3:

Access your IP camera. Make sure the APP is compatible with your IP camera. Apps vary in their requirements, some require to install the same system also on the computer to connect. Whatever APP you choose, you are required to enter the IP camera name and IP address. This helps to save the IP camera information and you can access it anytime with one click on your iPhone.

Now, you can follow the steps to view your IP camera anywhere with iPhone. Please kindly contact me with other detailed problem. It will be my pleasure to solve your IP camera questions.

Using Crime Guard Live Video Monitoring System Services

If you have difficulty applying this technique, you can use security services. I recommend you to contact crimeguardinc.com right now. They can monitor your property and assets for unwanted harassment.

crime guard live monitoring

crimeguardinc.com is a company engaged in security, in particular, is live remote monitoring using superior technology. This means you don’t have to worry about any crimes that may arise on your property and assets. You can monitor it live 24 hours per day using your phone, laptop, or PC.

Their system will accurately detect and prevent criminal activity that occurs in and around your facility. Their live video monitoring service is affordable and safe. Before you decide to use his services, you can contact him to ask some questions.

How to Restore iPhone When Damage

A damaged iPhone can be a useless iPhone. It’s very difficult to help to make things perform when your iPhone screen will be cracked or even damaged. Right now there really is no option but to be fixed. Getting hired fixed, even though, is not always effortless nor is this cheap. Nonetheless, you have choices in iPhone restore. Broward repair shops provide repair providers by pros who know what they do and prepared that will help you save money. You might also need the option of doing restore your own iPhone. For Backup your iPhone, see the instructions here iPhone user guide.

Tips For Restore iPhone

When you choose to possess a professional manage your iPhone restore, you need to be careful. Many people feel they have to send out it to be able to Apple and give the high costs regarding iPhone repair.

restore iphone

If you want iPhone repair, you must find the best technician. Just be cautious about deciding on the best company. You’ll need a repair shop that features a professional mindset. They should be knowledgeable about iPhone repair. Broward restore shops do not just about all offer Apple solutions, so make sure you check that very first. You don’t want somebody working on your iPhone who isn’t skilled inside Apple products or you might end up with greater problems compared to what you started along with.

You have to give thought to price. The entire reason to opt for local services to save money, you would like inexpensive costs, but not also cheap. You obtain what you purchase, so pricier to get great service from the company in which charges you an amount that is as well good to become true. You ought to aim to obtain a price this is a good value.

Make sure you check out the corporation’s reputation. Make sure these people have a good waiting in the community and they are known for performing good work. It really is pretty an easy task to ask around concerning iPhone repair.

You will find the option of carrying out the screen restore on your own. Obviously, with Do it yourself work you generally risk creating more harm to your telephone. You have to be careful about what you need to do. You should look for a video or perhaps guide about the internet and look at it prior to even coming in contact with your iPhone. That’s all about how to restore iPhone.

How to Get iPhone 12 User Manual and Using It

Many people who are willing to buy or have already purchased the iPhone 12 are mostly wondering about how to get user manual for this device. The iPhone 12 pro user guide will be useful for those who want to do something, but they didn’t know or want to try something new on the phone.

iphone 12 user manual

As you now that iPhone 12 has just released and undoubtedly many people will need the user manual guide so they can use the phone better. Many people asked about the manual use if it already released or not.  The answer is yes, it was released. There are two release versions. The first one comes from the Apple, and the one another comes from another source.

How to Get iPhone 12 User Manual Free

For those who are asking about how to get the iPhone 12 user guide, you can just visit the Apple’s official website. There, you probably will not find the guide version which exclusive for the iPhone 12.

Find the menu that written for the iOS 14 guidance. iPhone 12 includes the manual for iOS 14. While for the other sources, you can just look it on many websites that specialize collecting the manual used for the iPhone.

How to use the iPhone 12 User Guide

You can start from the thing that you want to do. As an example, you want to do something with the Settings. Make sure you choose the menu that suits you. Then, search the sub-menu that you want.

Finally, follow the setup or the guide that you see there. And, you can finish it with that. Do the same if you want to try other great things with Apple iPhone 12. With the information from the question of how to get Apple iPhone 12 user manual, you can enjoy many new things with the phone.