iPhone XR user guide is very essential for you who have just bought an iPhone XR. Why can it be like that? Yea, the reason is that the iPhone XR user manual PDF will help you to know everything about it. It can be the ways to set up this iPhone XR and also the additional user manual of the iPhone XR. Completely, you will find both matters in this following review.
How to Set Up iPhone XR According to User Manual for iPhone XR
When do you want to find the ways of using the iPhone XR, don’t worry! It will be available for you. So, just follow these ways well!
Insert the SIM card
The first step that you have to do in using your iPhone XR is inserting your SIM card. It must be done because this step is very important in order to be able to start using your iPhone XR. In relation to the SIM card, you are suggested to buy a nano SIM. It is because this iPhone XR uses the nano-SIM.
Complete the set up of iPhone XR
After inserting the SIM card is done, don’t forget to complete the set up of your iPhone XR. It can be recognized by turning on your iPhone. When you turn on the iPhone, you will find the icon of Setup Wizard. What does it mean, guys? Yea, it means that it is necessary for you to set up your iPhone. The first thing that you can do is swipe across the screen. Also, please select the language that you want to use and the region where you live.
Set up the Touch ID
In order to be able to set up the Touch ID on your iPhone XR, you are suggested to scan your own print. After that, just click continue. In addition, when you want to protect the data, you can set the password.
Additional Iphone XR User Manual
Actually, there are three additional matters of the user manual in the iPhone XR. Do you want to know them? Let’s check them out!
Navigating around
In fact, there are many buttons that can be used and of course, it has a different function. Thus, you are very suggested to memorize all of them well.
Connect to the internet
If you want to connect your iPhone XR to the internet, what can you do? It is very easy to do. Just turn on the Wi-Fi network that is available. However, if you want to use your data, just turn on your cellular data.
Set up the email
In relation to that, you can set up the email by going to the setting, tap the email, and select your account. After that, you can sign in to your account by entering your password.
Well, both are the important matters that you can know from iPhone XR user manual. It will be beneficial for you if you understand it well.
Have you never change your iPad during your life? Congratulation! Apparently, you are the people who are not changeable. By the way, you need to upgrade your skill and information. Learn to the iPad tips for seniors because you will find a lot of benefits and make you happy.
Here, you are going to master the iPad tips and tricks for senior start from the basic lesson. However, you may get the information in general. Nonetheless, you keep able to catch the point. Soon, check this out!
12 Basic lessons of the iPad Tips for Seniors
Directly, here are 12 basic lessons that you should know:
iPad tour: There is a circular button below to start your browsing on the iPad
Download the First Application for iPad: This lesson guides you in downloading the iBooks application which is an Apple store and reader for ebooks.
The first 10 things you must know and do: This lesson is about the first things you have to do with your iPad.
Steps to navigate iPad like Pro: Electronic devices have small tricks for faster application use.
Best use: The best use of the iPad is the presence of portable TV and GPS for cars.
17 ways to Siri that make you more productive: Siri is a voice recognition tool that makes it easy for you to communicate
The Best Free Application from iPad: iPad provides many free applications where you quite download it.
Great tips for all iPad owners: Download the guidebook and find lots of tips for exploring your iPad.
How iPad regulates your life: it is about how your life becomes more effective after using the iPad.
Securing the iPad: Secure from iTunes bills that are swollen or from children who are not yet time.
How to Reboot the iPad: Everyone has the opportunity to know how to reboot their iPad which freezes or slows down. This method can be the key to solving your problem.
See the 7 Tips to operate your iPad
Next, the following are 7 tips to use your iPad:
As a magnifying glass
Scan documents with a camera
Add emergency contacts
Safari browser reader
Set the font size
Make screenshots and tags
Buy books, applications or music for free
That is the iPad tips for Senior where the beginners may need it too. If you have mastered the tips, please, share to the people around you. You will be useful for other people and you can play the iPad together.
When I get some problems in my laptop, I always try to find laptop solutions by myself first. It will give me some kind of satisfaction when I can troubleshoot or repair some broken things, including a laptop. On the other hand, fixing the laptop by yourself will certainly be less expensive rather than purchasing a new one. That is why you can try fixing your laptop first, because some problems in a laptop are easy to repair.
Laptop Troubleshooting and Simple Repair
Even though you can easily fix some parts in your laptop by yourself, there are some other parts that are difficult and also expensive to repair. The parts are those that belong to the most important parts in the laptop, such as motherboard, CPU, and GPU (Graphic Processing Unit). That is why you should try to maintain the main parts well to prevent the damage as much as you can.
Repair Laptop with the Operating System Damages
The symptoms of broken operating system could be seen when the system doesn’t boot well, whilst the disk looks working, the display turns on, and everything looks normal. To fix the broken operating system, go to the Safe Mode where you can diagnose and might repair the problem. Damaged registry or faulty driver could be the main causes of damaged operating system. Just reinstall the operating system to save time.
Repair Laptop for the Damaged Hard Disk Drive
As the home of the operating system, a hard drive or solid state drive stores every data in your computer. When this part is damaged, it will not go out the blue and sometimes you can see some warning signs, such as; frequent freezes, poor or slow performance, corrupted data, strange sounds, etc. When you can see the display and blinking indicator lights of the laptop yet there is nothing happens next, it means that the hard drive has died. But when no more sound and lights while the charger is connected, the broken area might be on the motherboard or the components.
Replacing the hard drive is the best solution to repair my laptop from the dead hard drive. Get a new hard drive with the same connector and then replace the old one with it. The old part replacement can also be done when some problems happen in other important parts of the laptop, including the CMOS battery and also RAM.
Repair Laptop for the Display Problems
Display damage is a kind of problem that nearly impossible to fix. When you get a broken laptop, especially on the display, it means that you should find a new laptop to purchase. The worst condition of broken display could be when it doesn’t turn on at all. Try to use external monitor to see whether it is a motherboard damage case. If the laptop could turn on well with the external monitor, then you should replace the display. Replacing the display isn’t an easy work to do. But you can do it if you know the steps well. Besides, it will be an affordable solution rather than purchasing a new laptop.
If you only know one thing about web design, let it be the term “responsive.” Most good web designers and developers will make sure that you have what is called a responsive website, but as a small business owner or Webmaster it’s important that you understand how it works so that you don’t get stuck with a designer who didn’t bother. A responsive design is what’s going to make your website easy to see on all different types of screens—mobile, tablet, desktop, etc.—and in 2014 this will be a necessity if you want to keep up with your competition. If you end up with a design that isn’t responsive not only will your website look out of place, but it will look unprofessional on a mobile device and turn people away.
According to this article published on Convince and Convert, by 2014 mobile is predicted to overtake desktop Internet usage. The moral of the story: Understanding responsive web design truly deserves your undivided attention this upcoming New Year.
How Responsive Web Design Works
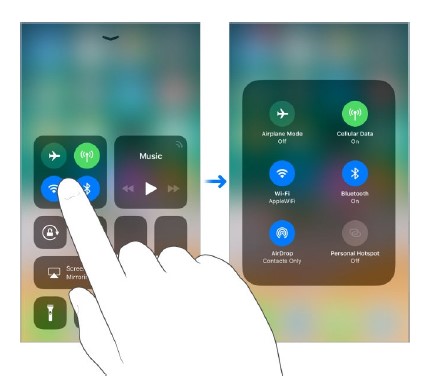
Having a responsive web design means that your website will respond to different screen sizes and make adjustments accordingly (with no work on your part). For example, if your design is responsive there are a few things that will likely change if someone looks at your website through a mobile phone:
Images will either be moved to the bottom of the screen or they will be resized so they don’t take up the whole screen.
Buttons might get larger to compensate for the small screen.
Important content should be at the top of the screen, so things like ads or a search bar would be moved to the bottom.
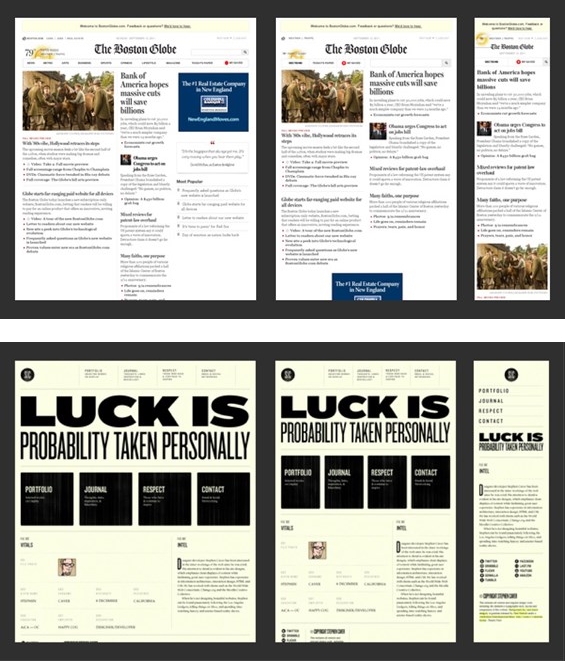
Of course, different things will change if you’re using a tablet for example. The buttons might not get pictured and the images might move in a different way than they did when you looked at your website on a mobile screen. Again, it’s all about the best possible view for users. The best way to understand this concept has always been through screenshots:
As you can see, things are moved around based on the size of the screen. If you have a responsive web design, this will automatically happen for your website. Had you not had a responsive design, someone would visit your mobile website and see nothing but a large ad or a big “L” in the second example. Below is an example that shows the opposite problem:
As you can see, going from a website built for a smaller screen to this larger screen also had its problems. This example comes from some sort of wide screen, and you can see a lot of white space on the sites because a responsive web design was not used.
Of course, some companies don’t have a responsive design and choose to have an entirely different website for mobile; however in general responsive web designs are easier to manage and more preferred.
Moving Forward with Responsive Web Design
As a Webmaster or small business owner just looking to get a feel for how it all works, the above are great basics that will help you know what to ask and what to request of your web designer. If you want to dig a little bit deeper into how it all works (CSS code, Media Queries, Meta tags, etc.) I highly recommend checking out this article from Elated. Of course, a good web designer or developer should also be able to answer your questions.
Do you have experience working with responsive web design, either as a consumer or as a business owner? Let us know your thoughts and your story in the comments below.
Do you look for a review about iPhone XS user guide for beginners? If it is so, it will be suitable as your need. Talking about the iPhone XS, actually, it is included to the iPhone user guide for iOS 11.
o, don’t be confused! Well, if you are the iPhone XS user and you don’t recognize the way to set up your phone, what will you do? Surely, you need the iPhone XS user guide in order to be able to access all of the applications on your phone. Do you agree? It should be like that.
Three Important Matters in the iPhone XS User Guide for Beginners
The first thing that you have to do is inserting a SIM card to your iPhone. You must do it because it is very important in order to be able to start your iPhone. In this case, because you are the users of iPhone XS, we suggest you insert a nano SIM. Why can it be like that? Yea, the reason is that the iPhone XS uses a kind of SIM card which is nano.
Complete the Setup of iPhone XS
Then, completing the Setup of iPhone XS is the second thing that you should do. After inserting the SIM card, you can turn on your iPhone. When the process of turning on the iPhone is running, you will find the icon of Setup Wizard. Essentially, that icon is used to set up your iPhone. In order to be able to start it, it is suggested for you to swipe across the screen of your iPhone.
In this case, you will set the language which you will use and click your country. Besides, you can click the network of Wi-Fi or you can also use the mobile connection to connect.
Set up the Touch ID
The last important thing in the iPhone user guide is set up the touch ID. When you will do this process, you should follow the steps that are available. It is done in order to scan your own print. If it has finished, you can click continue.
Okay, guys, those are the important things in the iPhone XS user guide for beginners that you can learn. So, have a nice learning!
I’ve often compared starting out as a blogger to trying to lose weight, or working out. It takes dedication, desire, perseverance, and willpower. On the surface, blogging seems simple. If it was so simple, then why do so many bloggers fail?
I’ve started blogging for new sites many many times. Before I refined my approach, I failed multiple times. Looking at each experience in a completely analytical sense gives me insight into why I failed. I’ve combined my experiences and consulted other bloggers to come up with a “top 5” list of common reasons bloggers fail.
1. Setting Expectations Too High
Probably the most common mistake new bloggers make is setting their sites too high. If you go into blogging expecting to make enough money that you can quit your day job and move your 5 person family to Panama, you’re going to get in over your head.
Back to my analogy of blogging being like losing weight, if you set your expectations too high, you’re bound to be disappointed. No one loses 100 pounds in a month, it takes time. Healthy weight loss should be done slowly over time. Blogging growth is no different. Normal organic blog growth happens slowly but surely over time.
Instead…
I’ve always found that the best attitude when you start blogging is to have high aspirations with low expectations. That sounds rather pessimistic, but it has really worked for me. By being enthusiastic and having high aspirations for my blog, I’m able to be passionate in my writing. By setting my expectations low, I’m able to devote more effort to the project over a longer period of time, without being disappointed in the results. This has given me the chance to push past the hump (the point at which most bloggers quit) and push on to bigger and better things.
You have to start small. Every mountaineer that has scaled Everest starts at the base of the mountain.
2. Creating Too Much Content
It might not seem like an issue, but creating too much content can doom your blog in more than one way.
By constantly pumping out content, you are more than likely sacrificing quality for quantity. Your posts will be subpar, and you won’t be winning any new readers. You might get luck any rank well for some long tail keywords, which could drive some traffic. Ultimately, your bounce rates will prove that your content is poor quality, and Google will put two and two together. Your rankings will suffer, and who would want to link to a content farm like that anyways?
The second reason you don’t want to produce too much content is that you’ll get burned out quickly, which could end in you quitting. Just like someone who is starting out a running program, if you try to run too much at the beginning, you’re going to get tired and frustrated. It’s better to ease into a routine. Consistently publishing content is a better approach than flooding your blog with content.
Instead…
Pace yourself. Set a blogging schedule that doesn’t interfere with the rest of your daily activities (like eating and sleeping). There is nothing wrong with writing a few blog posts a month.
Blogging can be a great way to drive traffic to your site. It might seem as though the more content you have, the more traffic you get, but this isn’t necessarily the case. Always remember that quality trumps quantity. One excellent blog post per month will always be better than 10 poor posts.
After you add good content, it’s time to do Linkbuilding. This is intended to make your blog good on SERP and can increase the keywords you want to target. If you are not familiar with this method, there are several services that can do it.
3. Monetizing From the Get Go
No one likes to see a blog with advertisements plastered in the header, footer, and sidebar. It’s a turn off for potential readers, and gives off cheap vibes.
It’s not uncommon for bloggers to monetize their blog. Lots of bloggers make a living form their websites and the services they offer. There is nothing wrong with making money online. What will cause you to fail is building a website or a blog with the soul purpose of putting ads in the footer to make a quick buck. That just won’t work.
Instead…
Make your first priority something other than making money. Start blogging because you want to become an author, or because you want to stake your claim as an authority in your niche. Do not start your blog to make money – it just won’t work.
4. Being Unoriginal
Another reason that bloggers fail is because they are completely void of unoriginal concepts. Being a successful blogger is not easy, and you’ll have to constantly come up with new and unique ideas to keep your blog interesting to readers.
When bloggers run out of ideas, they’ll look to their industry influencers for ideas. Is there any blogger out there who can claim that they haven’t partially or completely copied an idea from another writer? Probably not. It’s inevitable that content will get duplicated and rewritten, but problems arise when a blog is based on this concept. Blogs need unique content to thrive.
Instead…
It’s easier said than done to come up with unique content for every single post. The reality is, that nearly everything you write will be influenced by something that has already been written. The key is to take your own unique spin on the topic, so while the subject matter itself might not be something fresh and new, but your take on it will be.
5. Giving Up
Giving up on blogging is the easy way out. It’s easy to give up on your site because it’s not producing results, or because it’s not gaining the traction that you’d hoped.
I’ve described to other bloggers before the proverbial “hump” that bloggers must get over before they’ll see nice results on their site. The hump I’m referring to is strictly based on site traffic. When a brand new site launches with no little to no fanfare, traffic will be slow going for a long time. Many bloggers get frustrated and give up.
Instead…
Don’t get discouraged by small traffic numbers! Every blog goes through this in the beginning (unless you have an unlimited budget), and the best blogs are the ones that stick it out. Most bloggers quit before they get over the hump.
Once your blog starts to get noticed in your industry, you’ll start to get more and more attention from other bloggers in the form of links and social mentions. Search engines will follow, and your traffic will increase. Most bloggers don’t make it to this point because they give up before their traffic hopes and dreams are realized.
Final Thoughts
Having high aspirations and low expectations will set you up for success, but will be less painful if your project fails. This is blogging we’re talking about here, not launching a new clothes line. We don’t need to “visualize our success” and set our expectations sky high – we need to temper them. If you’re starting out as a blogger, do so as a hobby. If you approach it expecting nothing in return, you’ll get back more than you ever thought possible.
Pace yourself when you publish content. Too much content too quickly will burn you out. Burnt out writers produce poor content, and readers will start to ignore you. Set up a publishing calendar, and make a commitment to publish a handful of high quality posts each month. If you have time for more, go for it!
Never start a blog with the sole purpose of generating income from your website – monetizing your blog should always take a backseat to your mission. What is the real reason you wanted to start a blog in the first place? Tell your story, and teach others. If you happen to get some ad revenue along the way, consider that a bonus.
Don’t copy others content verbatim, instead gain inspiration from other authors, and put your own unique spin on a topic that’s been written about before.
And finally – don’t give up. Your blogs growth will be slow going at first, don’t get discouraged! Keep plugging away until you get over the hump, and you’ll never look back!
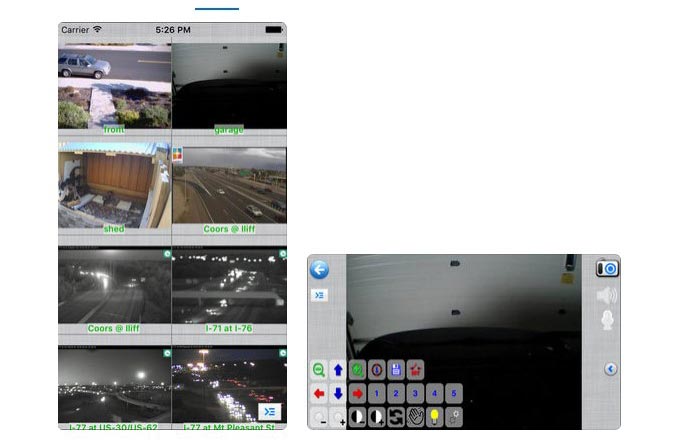
Due to the popularity and portability. iPhone becomes one of the most ideal choice to monitor the camera surveillance video among the various mobile devices. With your iPhone, you can build a perfect security system for surveillance. You will first need to ensure a computer and network are both accessible to transfer the video feed to the browser. An APP is also needed to connect your iPhone and the camera feed to get the sync video. Alternatively, Safari can be chosen on your iPhone to use as the web browser instead of the APP. Keep in mind.
Step by Step Use iPhone As an IP Camera
Step 1:
Install the IP camera viewer app. The proper is needed to view on your iPhone. The APP can be searched in store and updating constantly. Take a while to make the good comparison with them and purchase one. I will recommend the iCam app by SKJM and the IP Cam app by Senstic. Both of the two APP work well either receive camera feeds to transfer to a smooth video or applied as a motion detection sensor. The email alerts for detected movement perform as well as on the computer. Usually, hundreds can be available, but unluckily, the majority of them are no longer free.
Step 2:
iPhone prepare. Before turning your iPhone, you need to make sure your iPhone would not ring or beep on its own to avoid unnecessary alert that effects the monitoring. Turning down the sound of the certain app is quite necessary. Such as the daily alarm clock. You can also convert to No Disturb mode to prevent any rings, alerts, and noise which will occur. There is another option to turn your phone into flying mode. Remember to access the wifi network again for the Wifi turns off automatically in flying mode.
Step 3:
Access your IP camera. Make sure the APP is compatible with your IP camera. Apps vary in their requirements, some require to install the same system also on the computer to connect. Whatever APP you choose, you are required to enter the IP camera name and IP address. This helps to save the IP camera information and you can access it anytime with one click on your iPhone.
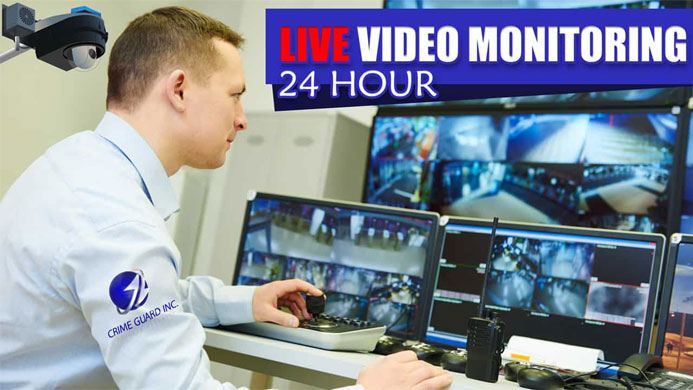
Using Crime Guard Live Video Monitoring System Services
If you have difficulty applying this technique, you can use security services. I recommend you to contact crimeguardinc.com right now. They can monitor your property and assets for unwanted harassment.
crimeguardinc.com is a company engaged in security, in particular, is live remote monitoring using superior technology. This means you don’t have to worry about any crimes that may arise on your property and assets. You can monitor it live 24 hours per day using your phone, laptop, or PC.
Their system will accurately detect and prevent criminal activity that occurs in and around your facility. Their live video monitoring service is affordable and safe. Before you decide to use his services, you can contact him to ask some questions.
Finding quality images for your website or blog is one thing, but finding quality images that are also free is an entirely different conversation, especially if you don’t want to be sued.
The sad truth is that if you are using images that you don’t own, and are not following the license associated with that image, you are walking a fine and dangerous line. I’ve heard horror stories from a few bloggers who were sued because they used an image without paying for it, sometimes on a blog post that was several years old. They pursued several avenues, but ultimately ended up forking over the fine. It’s a hard lesson to learn, and one that I hope you never have to go through.
So, to help you on your journey to find free, high quality images; here is a list of 10 fresh sites that provide just that. Each site is unique and some have different terms. Make sure you always research an images license before using it, and when in doubt, provide credit!
1. Unsplash
Unsplash is perhaps my favorite on this list. The quality of the photos is extremely impressive, and I would have otherwise expected to pay for these images. The images to choose from range from landscapes, architecture, technology, wildlife and much more. Each photo is obviously the product of a talented photographer, and we get to reap the benefits!
Unsplash is 100%. You can literally take the images and do whatever you want with them, no questions asked. This is as good as it gets. Unsplash provides 10 new photos every 10 days. I only wish there was more sites like this!
2. Gratisography
Gratisography is a project by Ryan McGuire that has some really nice photos that are completely free of copyright restrictions. New photos are added each week.
3. Little Visuals
Little Visuals is an ironic name, as this site gives you some massive images. I’m talking 5000 pixels and wider. It looks like they stick with nature and wildlife themed photos, but all the images are very high quality. Little Visuals provides 7 new images every 7 days (although I don’t believe they’ve updated the site in a while). Subscribe with your email address to get the images sent to your inbox.
Little Visuals uses the Creative Commons license, and allows you to use the images in any way you want.
4. PicJumbo
PicJumbo is a newer free photo site, but it’s just as good as the others. Images are free to download and do with as you please, restriction free. New images are added daily, so make sure you check back frequently!
5. MorqueFile
MorgueFile is a larger site, and does offer paid images from iStock and others, but there are lots of quality free photoes. The MorgueFile license allows you to copy, distribute, transmit the work and to adapt the work, without attribution. The only thing you are prohibited from doing is using the image in a stand alone manner.
6. New Old Stock
New Old Stock is an interesting site that features…you guessed it…vintage photos. These vintage photos are from public archives and are free of any known copyright restrictions – so go nuts! This is my go-to site if I’m working on a project that needs an old time appeal.
7. WeFunction
WeFunction is a design blog written by Liam Mckay, who claims he isn’t much of a photographer, but the free images he posts are awesome. Liam posts small packs of free images that are completely and utterly restriction free. I certainly hope this is something that Liam continues!
8. SuperFamous
SuperFamous posts photos under the Creative Commons Attribution 3.0 license. You can use them in any way you’d like, you just have to provide credit. It appears to be another site that isn’t updated frequently or has been abandoned, but there is a large amount of really stunning photos. The photographer clearly likes taking pictures from planes!
9. Death to the Stock Photo
Death to the Stock Photo is a site dedicated to providing you unique and high quality photos, or exactly the opposite of what they consider a “stock” photo. Death to the Stock Photo has their own license, but what it comes down to is unlimited and unrestricted use without required attribution.
In order to take advantage of what they have to offer, you need to sign up with your email address. After doing so, you’ll get great photos emailed to you from different artists. It’s like a birthday present in your inbox.
10. Flickr
How could any free photo list be complete without mentioning Flickr? Flickr is a massive community of photographers and designers, and utilizes Creative Commons licenses, which just means you need to credit the image author, and adhere to any other limitations the author requests. Check the license for the photo before using it!
I’ve linked you to a search for “nature” images, but you can literally run any search you want, there is a nearly endless stockpile of high quality images at your disposal.
Final Thoughts
There are plenty of sites out there that offer royalty-free or Creative Commons licenses for images, but so many of these sites have the “stock” feel to them. Stock is boring, so when I look for images for a blog post or for a new project these are the sites I look to first. There are some amazing artists and photographers out there offering the fruits of their labor for free.